CS4735 Computer Graphics
Lab 5 Oct. 16, 2006
Purpose: To gain an understanding of how OpenGL draws
3D mesh objects, and how one can create meshes.
1. As for all previous labs, log in to a
Linux workstation in ITD415, and create a subdirectory in your UNIX
subdirectory space called (e.g.) “L5”.
2.
Download the “drawmesh.tar” file from the CS4735 “Examples” web site
into your L5 subdirectory (use e.g. mozilla).
3.
untar the drawmesh.tar file to get the original source code back.
4.
Edit the “displayMesh.cpp” file to (a) create a Mesh
object, (b) load the BASICBAR.3VN file into a mesh
object (use the readFile(...) method), and (c) draw the
mesh object. Definitions for the
required methods are given in the mesh.h file. Type “make” to invoke the Makefile, which
will, in turn, compile and link the source code. This should result in an executable file
called “drawmesh”, which, when invoked (by
typing ./drawmesh at the command line) should draw a basic
barn shape on the screen as shown below in Figure 1.
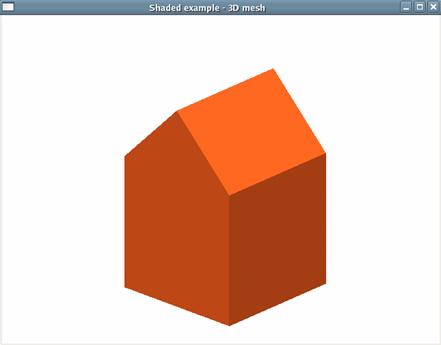
Figure 1. BASICBAR.3VN mesh file plotted on the screen.
5.
Modify your “displayMesh.cpp” to draw other 3VN files. For example, draw the WINEGLAS.3VN mesh that draws
a wine glass. Experiment with the
lighting parameters to make the object look more “glassy”. Changes to the camera and eye setup will be
required to get reasonable views of the different objects. Start with changes to the “half-height of the
window” winHt.
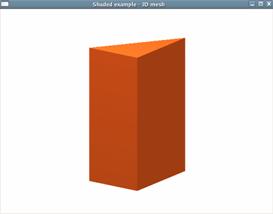
6. Add a method called makePrism(PolyLine P, float H) to your mesh.h and mesh.cpp code (as part of the Mesh class) to define a method that takes as input a polyline P of points, and a height H, and creates the mesh for a prism with P as its base (in the x-y plane). Follow the suggestions in section 6.3.1 (pp.300-301, and pp. 310-311) of the text. Test your makePrism(...) method with the polygon shown in Figure 2 below with H = 2.0.

(a) (b)
(c)
Figure 2. (a) A test base polygon for the makePrism(...) method, (b)
prism drawn in 3D, (c) result of drawing the prism using OpenGL mesh object
(with up = (0, 0, 1)).
When drawn, the prism should look like that show in Figure 2 (c) above.
Hints:
1. The number of vertices in a prism = 2N for N = number of vertices in the base polyline. Vertices are numbered 0, ..., N-1 for the base polyline, and N, ..., 2N-1 for the “cap” polyline.
2. The number of faces is N+2. For the first N faces, we define the jth wall, (j = 0, ..., N-1), a face with four vertices is created having indices j, next (j), next(j) + N and j + N. next(j) = (j + 1) modulo N takes care of the wraparound from the (N-1)st to the zeroth vertex.
3. The last two faces are formed from the base polygon and cap polygon.
4. The pseudo-code for makePrism is as follows:
void
Mesh::makePrism( PolyLine P, float H)
{ // Make a prism of height H from a polyline
// See Hill, E.F., pp. 310-311.
// Depends on Point2 and PolyLine classes
(see mesh.h).
int N = P.num;
... define number of vertices, normals and faces ...
pt = new Point3[2*N]; //
array of 2N vertices
norm = new Vector3[N + 2]; // array of N+2 normals to faces
face = new Face[N + 2]; // array of N+2 faces
// make the vertex list
... needs a loop
// make the face list, and construct the
normals list at the same time
int indx[4];
// each face has four vertices
int next;
// next vertex = j + 1 modulo N
Vector3 fn;
// normal to one face
int normindx = 0; // index to normals
for(int f = 0; f < N; f++) // define all vertical faces (and normals)
{
... define the indx vector containing the index to each point in
counterclockwise order ...
norm[normindx] = newell4(indx); // normal to one face
face[f].nVerts = 4; // each vertical face has four vertices
face[f].vert = new VertexID[4];
for(int j = 0; j < 4; j++) // store the four vertex indices
{ // and four normal
indices
face[f].vert[j].vertIndex = indx[j];
face[f].vert[j].normIndex = normindx;
}
normindx = normindx + 1;
}
//
define the bottom face (trace vertices CCW from outside looking in
indx[0] = 0; indx[1] = N-1; indx[2] = N-2;
indx[3] = N-3; // CCW from 0
norm[normindx] = newell4(indx); // normal to bottom face
face[N].nVerts = N; // bottom face has N vertices
face[N].vert = new VertexID[N];
... need a loop to store the N vertex indices and N normal indices ...
normindx = normindx + 1;
// define the top face
indx[0] = N; indx[1] = N+1 ; // take first four vertices
indx[2] = N+2; indx[3] = N+3; // to define normal to face
norm[normindx] = newell4(indx); // normal to top face
face[N+1].nVerts = N; // top face has N vertices
face[N+1].vert = new VertexID[N];
... need a loop to store the N vertex indices and N normal indices ...
}
7. Save your prism mesh as a file called PRISM1.3VN using the provided writeMesh(...) method.
8. If you have time, test that you prism mesh generator works for a different prism, defined as shown in Figure 3 below.

(a) (b)
Figure 3. (a) A second base polygon for the makePrism(...) method, (b)
prism drawn in 3D.