
Java Installation Help
Read through all instructions before attempting to install Java. There is important information at the end of the page.
Much of our curriculum is based on the Java programming language. Although we encourage people to use the Lab space, either physical or remote, to compile and run their assignments, you may find it helpful to have it installed on your personal computer. The following is a set of instructions to aid you in installing Java.
Keep in mind that devices such as tablets and chromebooks are not able to install or run java. In order to use the Java Development Environment on these devices, you will need to use the Remote Labs.
Terms
JDK - Java SE Development Kit
JRE - Java SE Runtime Environment
Step 1 - Downloading Java
Computer Science uses a combination of Java and JavaFX in our courses. Below are some links for Linux, MacOS, and Windows to the version of Java installed in our labs. If you choose to use a different version of build of Java you may have different installtion instructions and you may experience different results to those lised below and during your course.
Downloads
Step 2 - Java Installation
Linux Installation
For all versions of Linux, download the TAR above and extract the tar.gz to a folder, /usr/lib for example. The rest of the Java folder structure is stored within the tar file. From there you will want to setup a couple of environment variables.
The JAVA_HOME variable should point the to the folder that contains the files that you extracted, the PATH variable should be changed to include the bin folder under the JAVA_HOME location, and The CLASSPATH should contain a . to indicate that Java should look in the current folder for classes.
export JAVA_HOME=/usr/lib/jdk-XX.X.X
export PATH=$JAVA_HOME/bin:$PATH
export CLASSPATH=.

For example:
export JAVA_HOME=/usr/lib/jdk-21.0.4+7
export PATH=$JAVA_HOME/bin:$PATH
export CLASSPATH=.
Now proceed to Step 3 - Verifying Java Installation.
MacOS Installation
To determine which version of Java to install, you must first identify the CPU your Mac is using. To do this, follow these instructions:
Identify your CPU
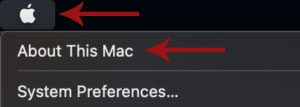
To idenitify the CPU you system uses, simply click on the Apple menu at the top left, then select "About This Mac" from the menu.
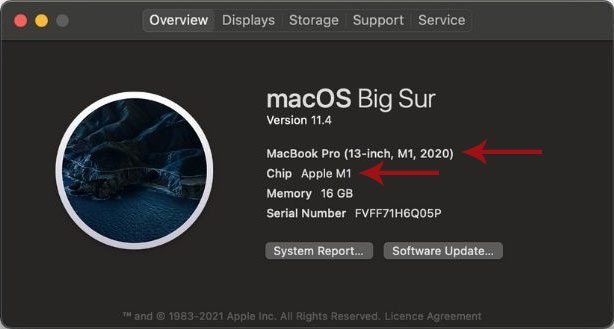
A window should appear that displays information about your Mac's hardware, this will include two lines that will identify the CPU. If these lines show an M followed by a number, such as M1 or M2, then you have an M-Series Mac. Otherwise you should use the x64 download for your Mac.
Installation
Once you have the correct version of Java downloaded, navigate to the folder that contains the PKG file and either open it to start the installer or drag it to the Application folder. Once the installer opens, follow the instructions and choose a location to install Java to.
Now proceed to Step 3 - Verifying Java Installation.
Windows Installation
Once you have downloaded the Java installer from above, navigate to the folder that contains the MSI file and open it to start the installer. Follow the instructions and choose a location to install Java to and make sure to change the install settings for "Set JAVA_HOME variable" to "Will be installed on local hard drive".
Now proceed to Step 3 - Verifying Java Installation.
Step 3 - Verifying Java Installation
Finally type java -version into a terminal window or command prompt to verify the installation and the version you are running. You should see output similar to the following, keep in mind that the version number may differ if Java has updated in the background since installation:
openjdk <version number> <date>

Example:
openjdk 21.0.4 2024-07-16 LTS
Step 4 - Download JavaFX
Now you have to install the JavaFX extensions.
The version of JavaFX used in our lab space is available for download below. Keep in mind if you choose to use a different version of build of JavaFX, you may have different installation instructions and may encounter different results when completing labs and assignments.
Downloads
Step 5 - JavaFX Installation
Installation for all platforms is the same. Download the correct ZIP file and extract the contents to location you can easily locate. We recommend that you extract this in the same location you install Java. In this example, we used /usr/lib/.
Once you have extracted the files, make note of that location as you are going to have reference it when you run java or the compiler, javac.
Note:
You need to use the full command to compile and to run a Java program that uses JavaFX.
Compile Command:
javac --module-path "Path to your javafx lib folder" --add-modules javafx.controls,javafx.fxml YourFile.java

eg:
javac --module-path "/usr/lib/javafx/lib" --add-modules javafx.controls,javafx.fxml HelloWorld.java
Run Command:
java --module-path "Path to your javafx lib folder" --add-modules javafx.controls,javafx.fxml YourFile

eg:
java --module-path "/usr/lib/javafx/lib" --add-modules javafx.controls,javafx.fxml HelloWorld